

With yeast comprising more than three-quarters of the flavor of certain beers, selecting the right strain can be crucial, and costly. One common way for a brewery to save money and create consistency is to skip the frequent trips to the yeast supplier.
But how? By harvesting the yeast (that is, by removing excess yeast from the fermentor to reuse in future batches). This practice can quickly save serious money by bypassing the need for fresh yeast for every pitch.
Far from being complicated, overly risky, or labor intensive, harvesting yeast can make brewery operations more streamlined, efficient, and inexpensive. Under healthy conditions, that original crop of yeast can reproduce about three to 10 times.
What Yeast Harvesting Actually Is—and Is Not
So what is harvesting, exactly?
During fermentation, yeast bifurcate and create surplus cells that can go to waste if discarded. As long as these cells are viable, you can crop them from one tank of fermented beer and repitch them into two tanks of wort. The yeast from those two batches then inoculates the next four. That multiplication process continues for approximately three to 10 generations, until the yeast show signs of fatigue.
“You can see how rapidly this tree can grow,” says Rob Raffa, founder of übergeek Brewing in Riverhead, New York. “By the 10th generation, you could have a hundred different beers made.”
Contrary to what some skeptics believe, harvesting is not a shortcut, a dumbing down of quality, or something only big breweries do. It’s also not the same as yeast propagation, which is the process of actively growing yeast in-house rather than simply collecting, storing, and repitching it.
A minority of brewers opt not to harvest because of labor limitations, production schedules, or desire not to court the risk of contamination. But the vast majority of commercial brewers worldwide—from the smallest to the largest—do harvest their yeast as standard practice.
The Cost Argument
The most obvious argument for harvesting comes down to cutting unnecessary costs. By spreading the initial purchase price over the number of batches brewed, the average cost per batch can decrease significantly. This is the marginal yeast cost.
To illustrate this, Escarpment Laboratories writes in its e-book, Yeast Management & Repitching, “Repitching increases the value you get from each yeast brink. For example, consider a brick of high-quality dry yeast that costs about $225. Its first use will cost $225 ($225/1 batch). Its second use will cost $112.50 ($225/2 batches), its third use, $75 ($225/3 batches), and so on…”
Now, let’s analyze a real-number scenario.
Raffa says he pays between $400 to $750 per pitch for liquid yeast and between $70 to $200 for dry bricks at his eight-barrel brewhouse. So, a $700 initial pitch drops to $350 by the second generation, to $233 for the third generation, and so on.
“That [cost], very quickly, becomes kind of negligible,” he says. “So, when I build out recipes for some of our beers, I won’t even put the yeast in the COGS. It’s hard to determine what that’s really going to cost because I know we’re going to keep harvesting it down the line.”
In deciding whether to harvest, you might use a back-of-the-napkin comparison between the per-batch cost of harvesting your choice of liquid yeast and dumping the often cheaper yet less robust dry versions.
To highlight another example from Escarpment: The average low-end dry yeast costs about $100 per 10 hectoliter (8.38 barrels), with premium liquid yeast costing up to $700 per 10 hl. At that difference, you would recoup the costs of the liquid yeast after repitching six times.
At Noble Beast Brewing in Cleveland, which runs on a 10-barrel system, co-owner Shaun Yasaki approximates that he generally breaks even on the seventh generation of liquid yeast and the fifth generation of dry.
“Obviously, if you just keep using dry yeast and [you] pitch it and dump it, your cost will go up even though your yeast may be cheaper to start with,” he says.
But production schedules ultimately dictate whether it’s worth harvesting any one particular strain, given that harvested yeast should ideally be stored between one and three days and then checked for up to two weeks to verify its viability. Yasaki usually dumps dry yeast for beers he doesn’t brew that often instead of buying—and potentially wasting—heftier yeast to harvest.
“We don’t brew enough hazies to keep it going just for those beers,” he says. “So I’m dumping… maybe we’ll say… $60 of yeast, instead of $500.”
When contemplating what, when, and how much to harvest, you should also account for the reality that while each successive generation gets cheaper, each of those facsimiles exposes itself to greater risk of contamination.
“Once the cost of that risk outweighs your savings, it’s time to retire that yeast,” advises Escarpment. The lab recommends that brewers “only repitch if the marginal yeast savings outweigh the marginal cost of contamination risk.”
To calculate the true break-even point, Escarpment suggests the following formula:
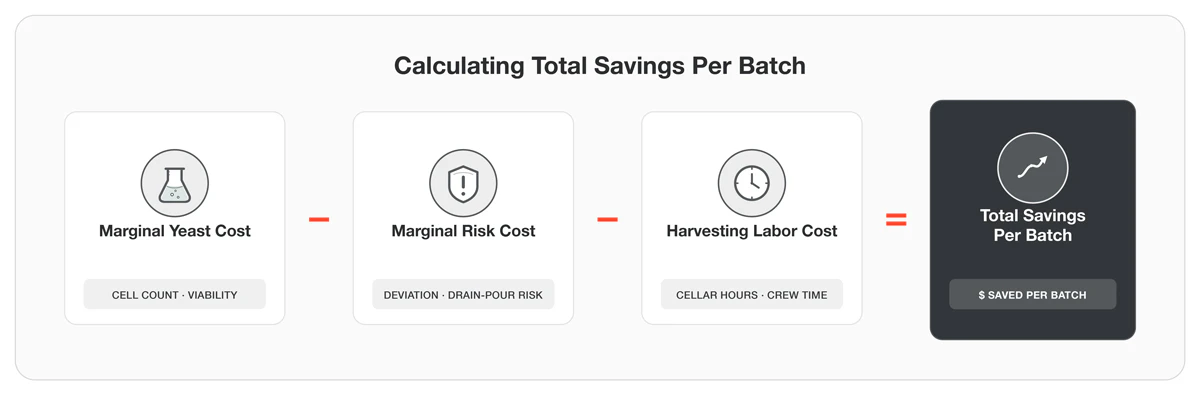
The real math surrounding cost is brewery specific. Strain, batch size, and labor costs all shift the break-even point, but this formula gives you a concrete way to know when the savings are real and when it’s time to let a generation go.
The Consistency Argument
Brewers who harvest and reuse yeast not only save money but also gain intimate knowledge of their strains. They come to know and rely on the temperature the yeast like, their attenuation and flocculation habits, their typical timing, and the sensory characteristics they give off.
This suggests the most important word to remember after cost is consistency. As long as you follow consistent harvesting and pitching practices, your familiarity lends itself to batch-to-batch consistency. And consistency equals a wealth of benefits: predictability, efficiency, lower demands on labor, and less money unnecessarily spent.
Plus, the beer should taste just as good every time it’s brewed.
What’s more, most yeast actually prefer postponing retirement. Gently used yeast have awakened from dormancy and acclimated to the wort environment, which makes fermentation begin much faster than with direct-pitched store-bought yeast.
As White Labs states on its website, “Having a versatile house strain will ensure an active yeast is always on hand to harvest and repitch, especially if a stuck fermentation occurs or brewing plans are changed.”
When Harvesting Makes Sense and When It Doesn’t
Despite its many advantages, harvested yeast can’t please all of the people all of the time. Before anything else, you need to consider how many times over the subsequent one to two weeks you plan to brew with a particular generation and strain. Outside of that narrow window, quality suffers.
Yeast quality also gets questionable when the yeast come from beers above 6.5% ABV. Heavily dry-hopped and high-adjunct recipes also stress yeast cells. So if you are syncing your yeast harvests with your schedules, you must find times to ferment, harvest, and rebrew low-gravity, low-hopped, non-adjunct beers within that one- to two-week timeframe.
To know whether your yeast is viable enough to reuse, make sure it passes the literal smell test.
Escarpment urges, “If the yeast doesn’t look or smell good, DO NOT USE IT.” [their capitalization]
The yeast slurry should look creamy and thick with little trub and no off-aromas. You shouldn’t harvest from fermentations that present any abnormalities because those will most likely persist in subsequent batches. You should also resist harvesting if your brewery has recently fought an infection.
Raffa believes the yeast itself will alert the you after enough generations. He says, “You get to a point where the yeast can start to get a little cross-eyed, and that’s where you’re like, ‘Alright, I finally have to get rid of this.’”
Though some brewers manage a single, versatile, house strain, most brewers Raffa knows maintain at least three strains—ideally, for clean ales, clean lagers, and one with strong sensory attributes.
The catch of working with multiple strains, commonly understood, include the possibility of cross contamination and the added logistical pressure of brewing often enough to use each strain within its viability window.
What You’ll Need to Get Started
Some breweries harvest and repitch the most simple way possible: the cone-to-cone method. This technique involves using a hose, pump, and block-and-bleed setup (to trash the trub) to transfer slurry from a finished beer to fresh wort waiting in another fermentor.
Here’s a list of the essentials you need to level-up your harvest game:
- Conical fermentor
- Hoses
- T-pipe fitting and a block-and-bleed setup (to direct the trub away from the slurry)
- Brink (i.e., a vessel, to hold slurry between uses)
- Cold storage (for the brink)
- Sight glass (to watch for when the trub stops flowing and the valuable slurry begins)
As important as seeing the slurry is watching the results. By carefully tracking the performance of every fermentation, you can quickly spot problems as well as plan schedules more effectively.
While some brewers consider this approach risky because it offers too little quality control, some small brewers feel this is enough information and equipment to launch early attempts at harvesting. However, smart brewers either get a microscope and hemocytometer to count cells before they start, or they follow expert advice to procure them as soon as possible.
“One can have pretty solid yeast-handling practices without a microscope,” Noble Beast’s Yasaki says, provided, “you’re tracking the yeast generation, seeing how it performs, doing your best to pitch fresh yeast, and not pitching yeast from an imperial stout into your blonde ale.”