
Everything You Want to Know About Harvesting and Repitching Yeast
Learn the ins and outs of harvesting and repitching yeast and why the practice pays off.
Harvesting and repitching yeast turns a recurring per-batch cost into a reusable asset, while giving brewers tighter, more predictable control over fermentation and less dependence on vendor lead times. In this webinar, working brewers who've made the switch walk through why the practice pays off, the obstacles that keep breweries from starting, and the repeatable process that makes it work at any size.
Speakers Include:
Kristen Ewer, Senior Brewing Expert, Sennos
Christophe Perdu, Director of Operations, Grand Strand Brewing Company
Amber Sawicki, Head Brewer and Director of Operations, Boomtown Brewery
John M. Verive, Contributing Writer, Craft Beer & Brewing
The Harvest: Equipment, Sanitation, and Technique
Harvesting yeast saves cost and ensures consistency—but only when done right. Learn the equipment, sanitation steps, and timing that turn slurry into usable, healthy yeast for repitching.

Pitching fresh yeast into every batch of beer is more than just wasteful; it’s expensive and can create an inconsistent brand. To avoid this, most commercial brewers harvest their yeast, meaning they collect viable yeast from one batch to use in the next.
While some brewers crop yeast floating at the top of an open fermentor, most crop from the bottom of conical tanks, where clumps of yeast cells fall during fermentation. Read on to learn exactly how to generate three to 10 generations of usable yeast using the bottom-cropping method.
The Three Layers of the Cone—and Why They Matter
Toward the end of fermentation, yeast cells bind into larger groups and settle out from the beer. As the liquid cools, these clusters fall to the bottom of the tank and mold into the shape of the cone. But this pile of flocculated yeast doesn’t display the same characteristics the entire way through. Rather, it forms three unique horizontal layers.
The bottom layer consists of trub—dead or prematurely flocculating yeast cells, hop detritus, and denatured proteins. The thin top layer holds poorly flocculating yeast. Brewers discard the bottom and top portions and keep the middle. This is where the healthiest, densest, and most genetically beneficial yeast form the heart of the extraction.
One might compare this creamy off-white layer to vanilla ice cream. Though dark beers make it harder to suss out the boundaries, in a paler beer, you can literally see, smell, and taste the difference.
“The layer to harvest reminds me of a milkshake,” says Matt Cole, who owns and oversees an annual production of 47,000 barrels of beer at Fat Head’s Brewery, in Ohio.
“Or soft-serve,” adds his QC and cellar manager, Tynan Smith.
Cole smells and sometimes tastes the slurry that comes off all 32 conical fermentors at Fat Head’s to monitor for off-flavors. He says a thriving middle layer is “very bready and earthy, and there’s an esterey characteristic to it. It smells like fresh-baked bread or when I make pizza dough.”
Equipment Needed to Harvest Yeast
The most basic harvesting setup calls for a hose, two clamps, and a valve to connect the donor and receiver tanks and regulate the flow of the slurry. But commercial brewers usually also rely on a couple more pieces of equipment than that. A sight glass lets them see when one layer gives way to the next, and a storage vessel is fundamental for brewers who don’t brew similar styles frequently enough to repitch right away.
Meet the brink, a vessel that can take the form of everything from a plastic bucket (not recommended) to custom models often outfitted with a hefty price tag. Breweries with three- to 15-barrel systems usually take the middle path by repurposing a stainless-steel keg. Both Cornelius (Corny) and Sanke kegs make for relatively affordable containers that can be pressurized, easily sanitized, and adapted to perform perfectly as brinks.
Breweries usually discover the sweet spot in an unmodified Corny keg or a Sanke keg retrofitted with a 4-inch cap and a 1.5-inch tri-clamp port down below. Both types require some pressure-relief capability such as an air lock, blow-off hose, check valve, or sterile filter.
If you’re repurposing a Sanke, resist the temptation to grab any old, used half-barrel. Unmodified Sankes can create stress for both brewer and yeast with their easily clogging ball-lock valves, as well as internal parts, grooves, and threads that can harbor bacteria. Many tank suppliers sell modified kegs along with new brinks designed for holding yeast.
The tank hookup remains the same whether you’re harvesting directly into a waiting fermentor full of wort or you’re siphoning off slurry to save in a brink. A sanitized hose attaches to the original tank via a tri-clamp, while a butterfly, ball valve, or block-and-bleed setup latches on to regulate or direct the flow.
The all-important sight glass allows a brewer to gauge the moment it’s time to start and stop gathering by watching as one layer gives way to another.
Sanitation Protocol
It goes without saying that careful brewers thoroughly clean and sanitize every piece of equipment that will touch the slurry. And it’s not enough to spray the brink with a keg washer or even go through the normal CIP/SIP process.
In its e-book, Yeast Management & Repitching, Escarpment Laboratories recommends manually cleaning “all parts of debris, scale, soils, etc., before sanitizing.” It identifies the biggest cleaning challenge as the leftover yeast that cakes the inside of the brink, especially the chimes. The lab advises scrubbing out the particles then filling the brink with hot caustic. Seal and soak from a few hours to overnight then rinse well.
Next, fill and seal the brink with a sanitizer like peracetic acid, iodophor, or even Star San. Don’t overlook wiping the ports. Meanwhile, soak the fittings in caustic and follow up by spraying the connection points with isopropyl alcohol. For an optional extra step, sterilize the fittings with a safe source of flame that’s long enough so you’re not close to where the isopropyl alcohol is sprayed.
Because sanitizers tend to lose their effectiveness within a few days, re-rinse, and refill the brink with fresh sanitizer right before you put it to work. Then purge with CO2.
“It gives enough counter-pressure so that you’re not rushing the yeast in there and channeling in beer. You’re at a way more controlled rate,” says Pete Barraud, owner and head brewer at North Fork Brewing on Long Island, in New York. He pressurizes at 15 psi.
Timing Matters When Cropping
Lower temperatures coax the yeast into temporary dormancy and cause them to floc out of suspension; it follows that breweries harvest after they lower the temperature near or at the end of fermentation. To get the thick, clean, silky slurry they seek, harvesting happens after they’ve brought down the temperature but before the slurry thickens into paste.
Unless they’re dry hopping or dosing with other late additions, brewers harvest just before the diacetyl rest—either once fermentation finishes or around 1°P short of terminal gravity. At that point, they cold crash the beer to 34–40°F (1–4°C) then leave it for 24–72 hours while the yeast compacts at the bottom.
To avert particulate matter and decreased viability, cropping occurs before dry-hopping or other factors that complicate fermentation. In these cases, brewers generally soft crash by lowering the temperature to slightly below primary fermentation levels. The exact numbers vary by strain, and you should explore and experiment with temperature ranges on your own.
When Barraud reaches 75 percent attenuation on an ale he plans to dry hop, he drops his tank to 58°F (14°C), then harvests after 24 hours. That’s when he cranks the heat back up to 66–68°F (19–20°C) and adds the hops.
“You still continue to attenuate a little bit, so you still can do the final five to ten percent,” he says.
Trub Drop—The Step Most Brewers Skip
Alas, one more step still stands between you and the actual accumulation: the trub drop. By removing and discarding the trub layer underneath the yeast cake, you eliminate dead cells, hop debris, and early flocculating cells that Escarpment says can contribute “rancid, rubbery, or sulfur-like off-flavors in the beer.”
But first, don’t open a single valve without applying 1–5 psi of CO2 or N2 to the tank. This prevents oxygen from entering the port as the cropping procedure displaces the trub and yeast. Be careful, though, because too much pressure can force beer to tunnel through the cone, leaving the yeast cake behind.
To release the trub into a drain or dump bucket, slowly feather open the valve. Though you’ll want to feather the valve during the entire harvesting process to keep beer from tunneling, feathering often serves a second purpose during trub drop—to unstick the yeast plug that may be blocking the exit.
“Sometimes that bottom chunk doesn’t come out with ease,” Fat Head’s Cole says. “So you have to gently open and close the valve to let that out without it blowing out too quickly.”
If you notice your beer start to channel, turn off the flow and let things settle down.
After you’ve dispensed approximately 1–3 gallons (4–11 liters) of trub, monitor the sight glass to spot the middle layer as it starts moving through. Before you begin capture, discharge a little more slurry to steer completely clear of any remaining dead or early flocculating yeast.
The Harvest Procedure
Now, it’s finally time to start collecting.
Close the dump valve and attach the hose or open the pathway into the brink or receiving tank (depending on your setup). Don’t open the valve all the way because, as with the trub drop, too fast of a flow can bring about channeling.
“If you pull too quickly, you’re going to pull a hole through the center of that cone where your beer can come through. If you pull nice and slowly, you’re going to end up getting a consistent pull of the section that you want,” Fat Head’s Smith says.
Stop harvesting once the visibly thinner and less-fluffy top layer appears. Alternately, stop when you’ve got one-quarter to one-third of headspace left in the brink—CO2-rich slurry needs room to expand as it warms.
Before you put the filled brink into cold storage, measure the gross and tare weights to calculate the net slurry weight. (You’ll want to know the weight of the empty brink ahead of time.) Label with the strain, generation number, harvest date, batch name, and tank number to record performance and troubleshoot any problems.
Brink Storage
Harvested yeast doesn’t respond to stress any better after fermentation than before. It degrades quickly in storage, where it demands an environment free from oxygen, light, or agitation. It also begins to weaken after a few days to two weeks, depending on strain and conditions.
Harvested yeast also insists on cold temperatures—generally accepted to be between 34 and 40°F (1–4°C). Though some brewers narrow or extend the window, research published in the Journal of the American Society of Brewing Chemists found no difference in viability or glycogen and trehalose intracellular levels in lager yeast stored within this range.
No matter how cold or coddled, these living cells do continue to produce CO2 inside the brink. That poses risk of explosion and poisons the yeast. For these reasons, brewers keep the head pressure at less than 2–5 psi and burp the brink at least once a day. Busy brewers can find peace of mind by adding a mini blow-off valve, hose, and bucket to purge automatically.
Barraud stores his harvested yeast at 38°F (3°C) and vents daily.
“Even at that cold temperature where everything’s sluggish, it will still build up pressure,” he says. “It’s imperative to bleed the pressure—one, so you don’t have a ticking time bomb, and two, so you’re not bursting your yeast cells and really lowering your viability.”
The Case for Harvesting Yeast
Harvesting yeast can cut costs quickly—but how many times can you reuse it before quality suffers? Here’s what experienced brewers actually watch for.

With yeast comprising more than three-quarters of the flavor of certain beers, selecting the right strain can be crucial, and costly. One common way for a brewery to save money and create consistency is to skip the frequent trips to the yeast supplier.
But how? By harvesting the yeast (that is, by removing excess yeast from the fermentor to reuse in future batches). This practice can quickly save serious money by bypassing the need for fresh yeast for every pitch.
Far from being complicated, overly risky, or labor intensive, harvesting yeast can make brewery operations more streamlined, efficient, and inexpensive. Under healthy conditions, that original crop of yeast can reproduce about three to 10 times.
What Yeast Harvesting Actually Is—and Is Not
So what is harvesting, exactly?
During fermentation, yeast bifurcate and create surplus cells that can go to waste if discarded. As long as these cells are viable, you can crop them from one tank of fermented beer and repitch them into two tanks of wort. The yeast from those two batches then inoculates the next four. That multiplication process continues for approximately three to 10 generations, until the yeast show signs of fatigue.
“You can see how rapidly this tree can grow,” says Rob Raffa, founder of übergeek Brewing in Riverhead, New York. “By the 10th generation, you could have a hundred different beers made.”
Contrary to what some skeptics believe, harvesting is not a shortcut, a dumbing down of quality, or something only big breweries do. It’s also not the same as yeast propagation, which is the process of actively growing yeast in-house rather than simply collecting, storing, and repitching it.
A minority of brewers opt not to harvest because of labor limitations, production schedules, or desire not to court the risk of contamination. But the vast majority of commercial brewers worldwide—from the smallest to the largest—do harvest their yeast as standard practice.
The Cost Argument
The most obvious argument for harvesting comes down to cutting unnecessary costs. By spreading the initial purchase price over the number of batches brewed, the average cost per batch can decrease significantly. This is the marginal yeast cost.
To illustrate this, Escarpment Laboratories writes in its e-book, Yeast Management & Repitching, “Repitching increases the value you get from each yeast brink. For example, consider a brick of high-quality dry yeast that costs about $225. Its first use will cost $225 ($225/1 batch). Its second use will cost $112.50 ($225/2 batches), its third use, $75 ($225/3 batches), and so on…”
Now, let’s analyze a real-number scenario.
Raffa says he pays between $400 to $750 per pitch for liquid yeast and between $70 to $200 for dry bricks at his eight-barrel brewhouse. So, a $700 initial pitch drops to $350 by the second generation, to $233 for the third generation, and so on.
“That [cost], very quickly, becomes kind of negligible,” he says. “So, when I build out recipes for some of our beers, I won’t even put the yeast in the COGS. It’s hard to determine what that’s really going to cost because I know we’re going to keep harvesting it down the line.”
In deciding whether to harvest, you might use a back-of-the-napkin comparison between the per-batch cost of harvesting your choice of liquid yeast and dumping the often cheaper yet less robust dry versions.
To highlight another example from Escarpment: The average low-end dry yeast costs about $100 per 10 hectoliter (8.38 barrels), with premium liquid yeast costing up to $700 per 10 hl. At that difference, you would recoup the costs of the liquid yeast after repitching six times.
At Noble Beast Brewing in Cleveland, which runs on a 10-barrel system, co-owner Shaun Yasaki approximates that he generally breaks even on the seventh generation of liquid yeast and the fifth generation of dry.
“Obviously, if you just keep using dry yeast and [you] pitch it and dump it, your cost will go up even though your yeast may be cheaper to start with,” he says.
But production schedules ultimately dictate whether it’s worth harvesting any one particular strain, given that harvested yeast should ideally be stored between one and three days and then checked for up to two weeks to verify its viability. Yasaki usually dumps dry yeast for beers he doesn’t brew that often instead of buying—and potentially wasting—heftier yeast to harvest.
“We don’t brew enough hazies to keep it going just for those beers,” he says. “So I’m dumping… maybe we’ll say… $60 of yeast, instead of $500.”
When contemplating what, when, and how much to harvest, you should also account for the reality that while each successive generation gets cheaper, each of those facsimiles exposes itself to greater risk of contamination.
“Once the cost of that risk outweighs your savings, it’s time to retire that yeast,” advises Escarpment. The lab recommends that brewers “only repitch if the marginal yeast savings outweigh the marginal cost of contamination risk.”
To calculate the true break-even point, Escarpment suggests the following formula:
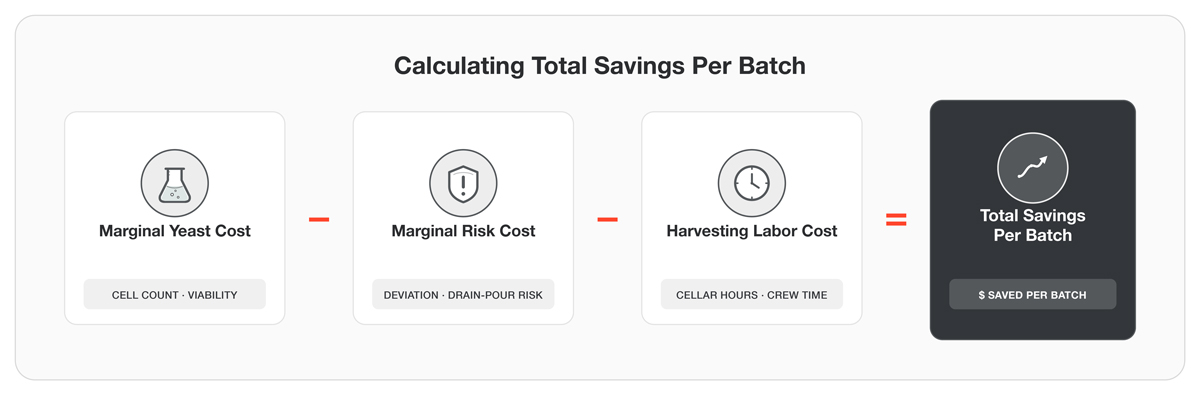
The real math surrounding cost is brewery specific. Strain, batch size, and labor costs all shift the break-even point, but this formula gives you a concrete way to know when the savings are real and when it’s time to let a generation go.
The Consistency Argument
Brewers who harvest and reuse yeast not only save money but also gain intimate knowledge of their strains. They come to know and rely on the temperature the yeast like, their attenuation and flocculation habits, their typical timing, and the sensory characteristics they give off.
This suggests the most important word to remember after cost is consistency. As long as you follow consistent harvesting and pitching practices, your familiarity lends itself to batch-to-batch consistency. And consistency equals a wealth of benefits: predictability, efficiency, lower demands on labor, and less money unnecessarily spent.
Plus, the beer should taste just as good every time it’s brewed.
What’s more, most yeast actually prefer postponing retirement. Gently used yeast have awakened from dormancy and acclimated to the wort environment, which makes fermentation begin much faster than with direct-pitched store-bought yeast.
As White Labs states on its website, “Having a versatile house strain will ensure an active yeast is always on hand to harvest and repitch, especially if a stuck fermentation occurs or brewing plans are changed.”
When Harvesting Makes Sense and When It Doesn’t
Despite its many advantages, harvested yeast can’t please all of the people all of the time. Before anything else, you need to consider how many times over the subsequent one to two weeks you plan to brew with a particular generation and strain. Outside of that narrow window, quality suffers.
Yeast quality also gets questionable when the yeast come from beers above 6.5% ABV. Heavily dry-hopped and high-adjunct recipes also stress yeast cells. So if you are syncing your yeast harvests with your schedules, you must find times to ferment, harvest, and rebrew low-gravity, low-hopped, non-adjunct beers within that one- to two-week timeframe.
To know whether your yeast is viable enough to reuse, make sure it passes the literal smell test.
Escarpment urges, “If the yeast doesn’t look or smell good, DO NOT USE IT.” [their capitalization]
The yeast slurry should look creamy and thick with little trub and no off-aromas. You shouldn’t harvest from fermentations that present any abnormalities because those will most likely persist in subsequent batches. You should also resist harvesting if your brewery has recently fought an infection.
Raffa believes the yeast itself will alert the you after enough generations. He says, “You get to a point where the yeast can start to get a little cross-eyed, and that’s where you’re like, ‘Alright, I finally have to get rid of this.’”
Though some brewers manage a single, versatile, house strain, most brewers Raffa knows maintain at least three strains—ideally, for clean ales, clean lagers, and one with strong sensory attributes.
The catch of working with multiple strains, commonly understood, include the possibility of cross contamination and the added logistical pressure of brewing often enough to use each strain within its viability window.
What You’ll Need to Get Started
Some breweries harvest and repitch the most simple way possible: the cone-to-cone method. This technique involves using a hose, pump, and block-and-bleed setup (to trash the trub) to transfer slurry from a finished beer to fresh wort waiting in another fermentor.
Here’s a list of the essentials you need to level-up your harvest game:
- Conical fermentor
- Hoses
- T-pipe fitting and a block-and-bleed setup (to direct the trub away from the slurry)
- Brink (i.e., a vessel, to hold slurry between uses)
- Cold storage (for the brink)
- Sight glass (to watch for when the trub stops flowing and the valuable slurry begins)
As important as seeing the slurry is watching the results. By carefully tracking the performance of every fermentation, you can quickly spot problems as well as plan schedules more effectively.
While some brewers consider this approach risky because it offers too little quality control, some small brewers feel this is enough information and equipment to launch early attempts at harvesting. However, smart brewers either get a microscope and hemocytometer to count cells before they start, or they follow expert advice to procure them as soon as possible.
“One can have pretty solid yeast-handling practices without a microscope,” Noble Beast’s Yasaki says, provided, “you’re tracking the yeast generation, seeing how it performs, doing your best to pitch fresh yeast, and not pitching yeast from an imperial stout into your blonde ale.”